arm.com's Documentation
GNU ARM toolchain
Martin THOMAS's ARM-Projects
Accessing ARM-Controllers with OpenOCD
OpenOCD - Open On-Chip-Debugger
OpenOCD's documentation - including JTAG hardware dongle, JTAG commands, GDB and OpenOCD, etc.
devkitPro - the toolchains of choice for homebrew game development, currently available for GameBoy Advance, GP32, Playstation Portable and GameCube. More platforms will be added as time permits.
devkitPro's files list in sourceforge.net - especially dswifi.
2009年5月22日 星期五

Building Bare-Metal ARM Systems with GNU
To read Part 1, go to What's need to get started.
To read Part 2, go to Startup code and the low level initialization
To read Part 3, go to The Linker Script.
To read Part 4, go to C and C++ compiler options
To read Part 5, go to Fine-tuning the application
To read Part 6, go to General description of interrupt handling
To read Part 7, go to Interrupt Locking and Unlocking
To read Part 8, go to Low-level Interrupt Wrapper Functions.
To read Part 9 go to C-Level ISRs and Other ARM Exceptions
To read Part 10 go to Test Strategies
To download Zip files with the C and C++ source code associated with this article series, go to Embedded.com's Downloadable Code page, or to Blinky for C and Blinky for C++.
2007年3月6日 星期二
Zipit, Zipit, Zipit !
今天同事根據 Internet 上的資料, 焊好 Zipit 上的 debug console, 再把 相關的檔案 flash 到 Zipit 之後, 開機, 然後成功 ~
當然, 事情並不是這麼順啦, 首先是 debug console 相關焊點並不都是這麼好焊. 光是找那個焊點, 就蠻花眼力的. 還好有善心人士照了一個很大的圖.
接著想要透過 debug console 來 reflash 時, 卻發現就算把 DBG/GND 短路後, 再開機, debug console 也沒有任何輸出. 所幸同事觀察到 Zipit 會有一個綠燈一閃一閃的, 想說會不會是debug console 本來就不會有輸出. 於是就根據說明 利用upl盲目上載相關檔案(zpm.bin, loader.bin, ramdisk.gz, zimage.dat)
將 DBG/GND 開路, 拔掉 AC 電源再插入, 果然就看到企鵝了.
接下來, 就是 試試看囉. 我用 root 登錄(不用密碼), 看了一 /proc/meminfo (約 14 MB), 執行 df (ramdisk 約 5 MB). 挫折比想像中的少, 蠻高興的.
註 1: zpm.bin (Zipit-PreBoot-Monitor)/loader.bin 的 source. 由下面的 rom mapping 可以知道為什麼最大只能有 2KB.
註 2: zipit 的 rom mapping
註 3: OpenZipIt 是個不錯的進階.
註 4: ZipIt Peek & Poke 有列出一些 Port/GPIO 的用途.
註 5: ZipIt 應用程式開發說明有一些不錯的 Link.
註 6: flash_notes.txt 對使用 debug console 來 reflash有更詳細的說明. 這個 網站 的說明還不錯.
當然, 事情並不是這麼順啦, 首先是 debug console 相關焊點並不都是這麼好焊. 光是找那個焊點, 就蠻花眼力的. 還好有善心人士照了一個很大的圖.
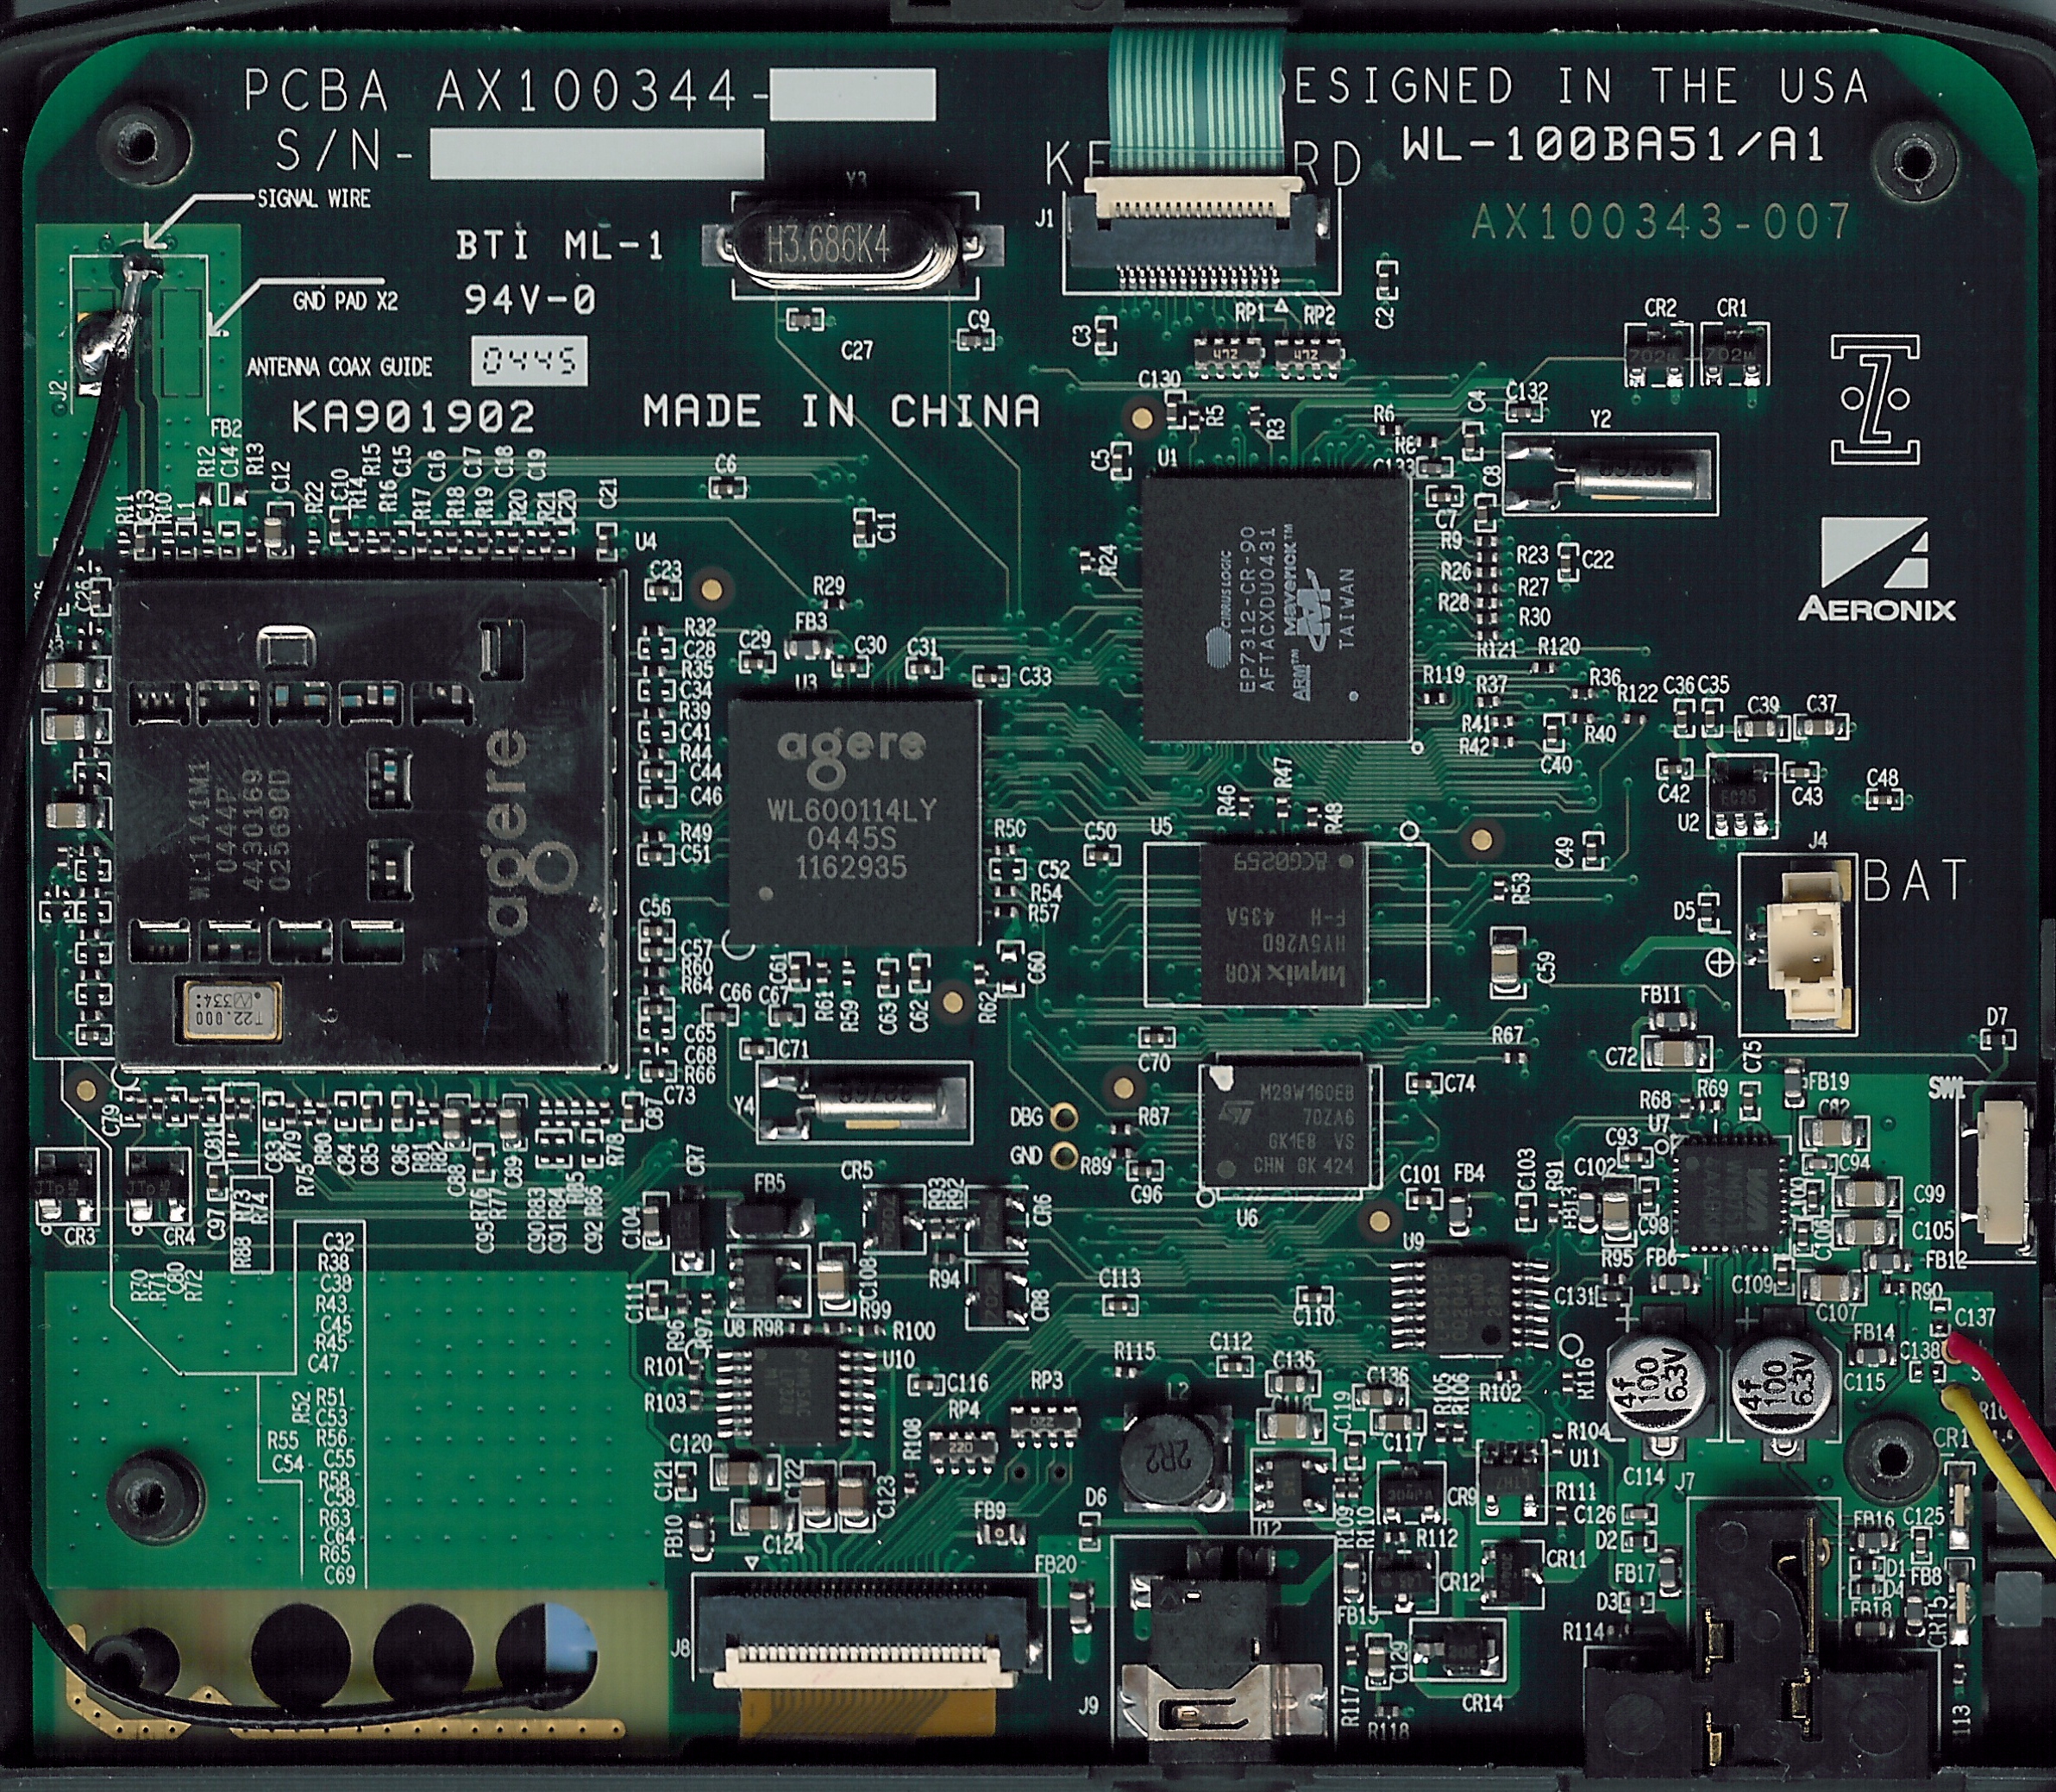
接著想要透過 debug console 來 reflash 時, 卻發現就算把 DBG/GND 短路後, 再開機, debug console 也沒有任何輸出. 所幸同事觀察到 Zipit 會有一個綠燈一閃一閃的, 想說會不會是debug console 本來就不會有輸出. 於是就根據說明 利用upl盲目上載相關檔案(zpm.bin, loader.bin, ramdisk.gz, zimage.dat)
將 DBG/GND 開路, 拔掉 AC 電源再插入, 果然就看到企鵝了.
接下來, 就是 試試看囉. 我用 root 登錄(不用密碼), 看了一 /proc/meminfo (約 14 MB), 執行 df (ramdisk 約 5 MB). 挫折比想像中的少, 蠻高興的.
註 1: zpm.bin (Zipit-PreBoot-Monitor)/loader.bin 的 source. 由下面的 rom mapping 可以知道為什麼最大只能有 2KB.
註 2: zipit 的 rom mapping
| 00000000 | boot loader (no GPL source) |
| 00002000 | start of kernel zImage compressed bootloader |
| 000045B0+- | start of gzipped Linux data (inside zImage) |
| 00090000 | start of gzipped Linux ramdisk image (over 4MB expanded) |
| 001F0000 | Flash stored properties -- "AerMedia Properties" |
| 001FFFFF | end of FlashROM (2MB) |
註 3: OpenZipIt 是個不錯的進階.
註 4: ZipIt Peek & Poke 有列出一些 Port/GPIO 的用途.
註 5: ZipIt 應用程式開發說明有一些不錯的 Link.
註 6: flash_notes.txt 對使用 debug console 來 reflash有更詳細的說明. 這個 網站 的說明還不錯.
訂閱:
文章 (Atom)